Let’s Configure Our Web Project for Remote Browsers and Parallel Execution
In the previous parts of this blog post series, we created our project and wrote a scenario together. I hope you were able to write 4 scenarios. Because you are going to run them in parallel and remotely!
- Let’s Create and Configure Our Web Test Automation Project!
- Let’s Write Our Test Scenarios!
- Bonus: Recording Failed Scenario Runs in Ruby
- Let’s Configure Our Web Test Automation Project for Remote Browsers and Parallel Execution
- Let’s Dockerize Our Web Test Automation Project
- Bonus: Recording Scenario Runs on Docker with Selenium Video!
- Let’s Integrate Our Dockerized Web Test Automation Project with CI/CD Pipeline!
- Auto-Scaling and Kubernetes Integration with KEDA
Remote Driver Configuration
In Part 1, you configured your drivers to run your tests on your local machine. Now you need to configure remote drivers.
First, you need a remote URL variable. As you did with all general configurations, you are going to state this inside your base_config.rb file.
@remote_url = ENV['remote_url'] || 'http://localhost:4444'
  def self.remote_url
    @remote_url
  end
With this code, you create a variable named remote_url. It means that if there is an environment variable called remote_url, your code uses the value of that variable. If not, then it uses “http://localhost:4444”. Why did we choose it as your default remote_url? You will see it in the following section.
Note: You can pass these environment variables with your custom values when executing this test script on the command line. You will see an example of this shortly.
Now go to the file where your driver configurations are.
In your driver.rb file, add your remote driver configurations under your case block.
 when 'remote-chrome'
 Capybara.register_driver :selenium do |app|
   options = Selenium::WebDriver::Chrome::Options.new
   options.add_argument('--window-size=1280,720')
   add_default_values(options)
   Capybara::Selenium::Driver.new(
     app,
     browser: :remote,
     url: BaseConfig.remote_url,
     :options => options

   )
 end
when 'remote-firefox'
 Capybara.register_driver :selenium do |app|
   options = Selenium::WebDriver::Firefox::Options.new
   options.add_argument('--window-size=1280,720')
   add_default_values(options)
   Capybara::Selenium::Driver.new(
     app,
     browser: :remote,
     url: BaseConfig.remote_url,
     :options => options

   )
 end
end
As you can see, the only thing that differs from normal drivers is that when you are creating a new driver instance, you state your browser as “remote” and give a URL that your script is to be run through. Note that this URL is the one that you configured in your base_config.rb file a second ago.
Selenium Grid Configuration
Now is the time to configure Selenium Grid!
Selenium Grid is what enables us to run your tests in parallel across multiple devices
- With Grid, you can easily run tests in parallel on multiple machines
- It is possible to run your tests on different browser versions
- It enables cross-platform testing (E.g.: Windows, macOS)
If you are ready, let’s get down to it!
First things first, go and download Selenium Server (Grid) from its official website.
Selenium Server is a .jar file, so you need Java installed on your machine to use it. You can download Java from its official website.
At the time I wrote this blog post, Selenium 4 hadn’t been released yet. You do not need to download webdrivers any more, but if you need to use earlier versions of Selenium for a reason, you can find them below:
You need to download the web drivers that you are going to use in your tests. These web drivers can be in the same directory as your selenium-server.jar file, or you can state their directory in the path. For this, please download the suitable version for your browser below. Note that the version of the driver should be the same as your browser’s.
Chromedriver: http://chromedriver.chromium.org/
Geckodriver (Mozilla): https://github.com/mozilla/geckodriver/releases
For MacOS, follow these steps:
- Move the chromedriver file to the "/usr/local/bin/” folder, which you can reach by opening Finder, and using cmd+shift+g combination.
Open the terminal and type `nano .bash_profile` command to edit .bash_profile file.
Add export PATH="/usr/local/bin/chromedriver” to the last line.
Press control+x, y and enter respectively.
Now you can initialize your Selenium Grid!
You can start Selenium Grid either in Standalone mode or with Hub & Node configuration.
Standalone: This mode combines all Grid components into one. With a single command, you can have a fully functional grid in a single process. But standalone mode can only run on a single machine.
Hub & Node: Hub & Node is the most preferred mode because it allows you to:
- Combine different machines (with different OS and browser versions) in a single Grid
- Have a single entry point to run WebDriver tests in different environments
- Scaling capacity up or down without tearing down the Grid
Let’s demonstrate how the standalone works.
Spinning Up in Selenium Standalone Mode
First, you need to spin up the grid in standalone mode by typing the command below in the terminal (use the version of your own jar file):
java -jar selenium-server-4.9.0.jar standalone
Note that you need to be in the same directory as the jar file or state its full directory to start it from another directory.
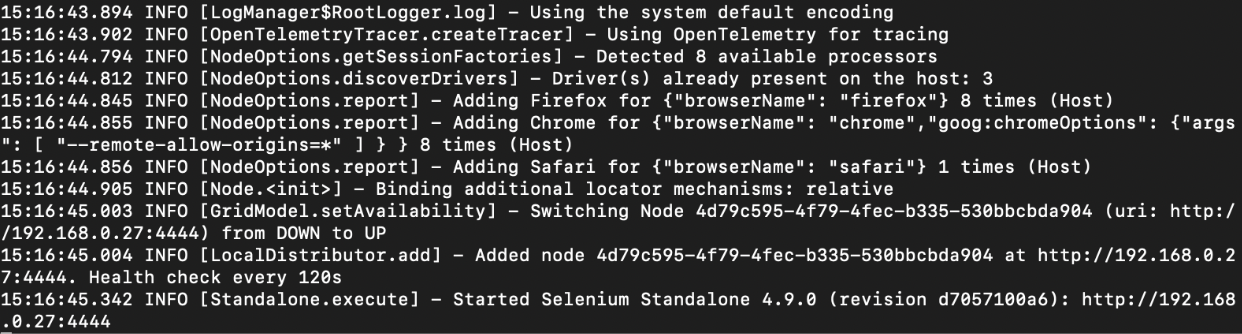
As you can see, the Selenium server detects the drivers you downloaded and added to your path automatically. It then connects these drivers as nodes to your hub. (If you use Selenium >4.0, it automatically detects browsers and downloads suitable webdrivers for them.)
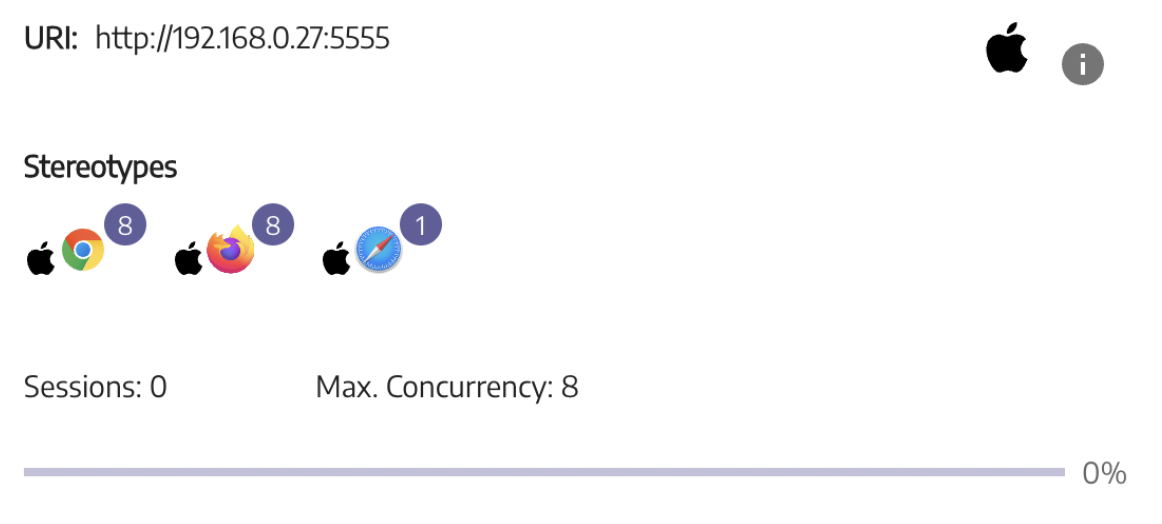
Let’s see how your grid looks by going to http://localhost:4444 via any browser. Does this URL look familiar? Yep, that’s your default remote-url. Selenium Server sets port 4444 for Grid by default.
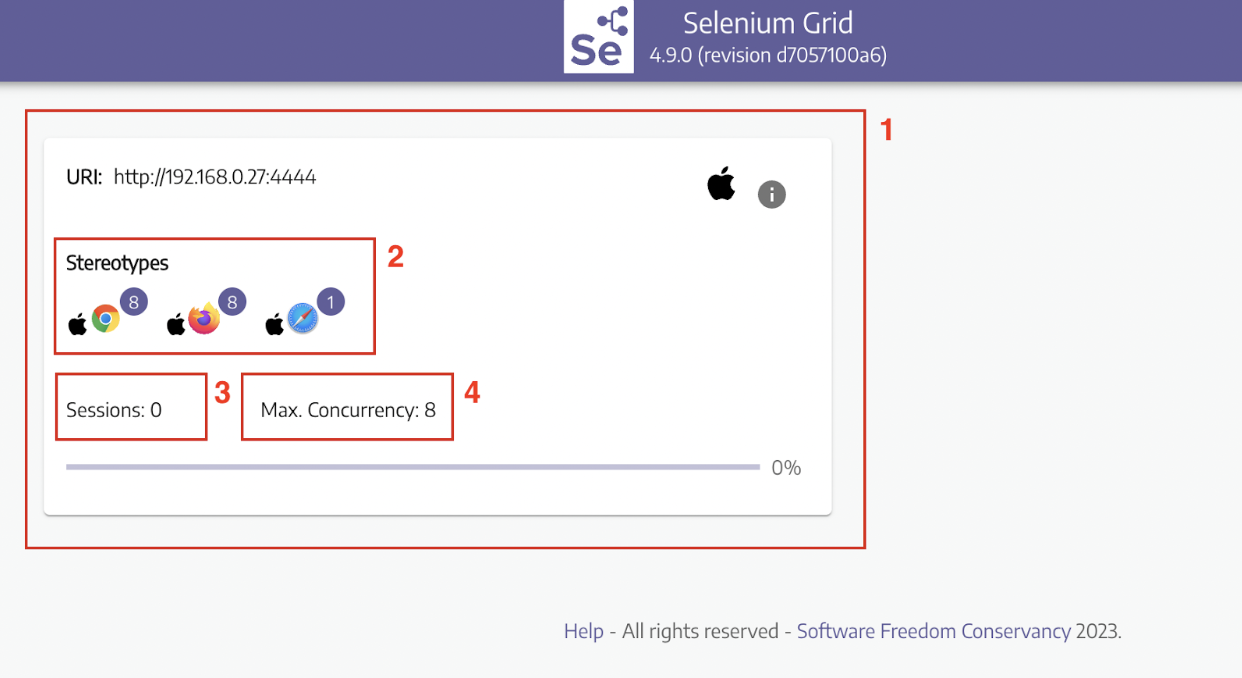
Let’s examine the grid and its components:
- This is your node. You can consider nodes as machines or containers.
- These are the drivers that are installed on your node. You can run your tests on these browsers.
- Sessions are the initialized browsers on which your tests are run. Currently, no tests are running, so it is 0.
- This is the maximum number of sessions that can be opened at the same time. Default is 8, so you cannot run more than eight tests on this machine simultaneously. You can override it with --max-sessions CLI option.
You can find complete CLI options for Selenium Grid here.
Now let’s run one of your tests and see if the session counter increases or not…
…
…did it increase? No? You did not change your default driver; that’s why!
Let’s go to base_config.rb and change your driver to “remote-chrome”.
@browser = ENV['browser'] || 'remote-chrome'
#     Available options
#       * chrome
#       * firefox
def self.browser
 @browser
end
Now run it again:
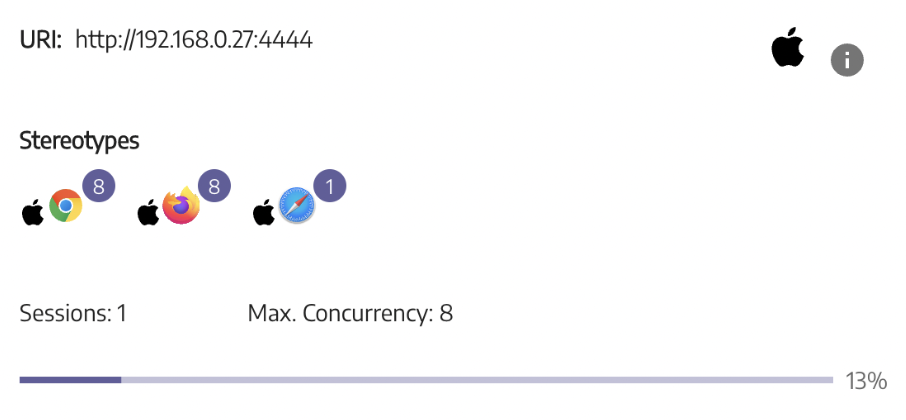
Now you can see that your machine is recognised by the grid!
Now let’s try the Hub & Node mode.
Spinning Up Selenium in Hub & Node Mode
For demonstration purposes, I am going to use my MacBook as Hub and a Node. And then connect my Windows laptop as a Node as well. If you have another device at your disposal, use it as well for this example.
To start Selenium Server in Hub mode, you need to type the following command in your terminal:
java -jar selenium-server-4.9.0.jar hub
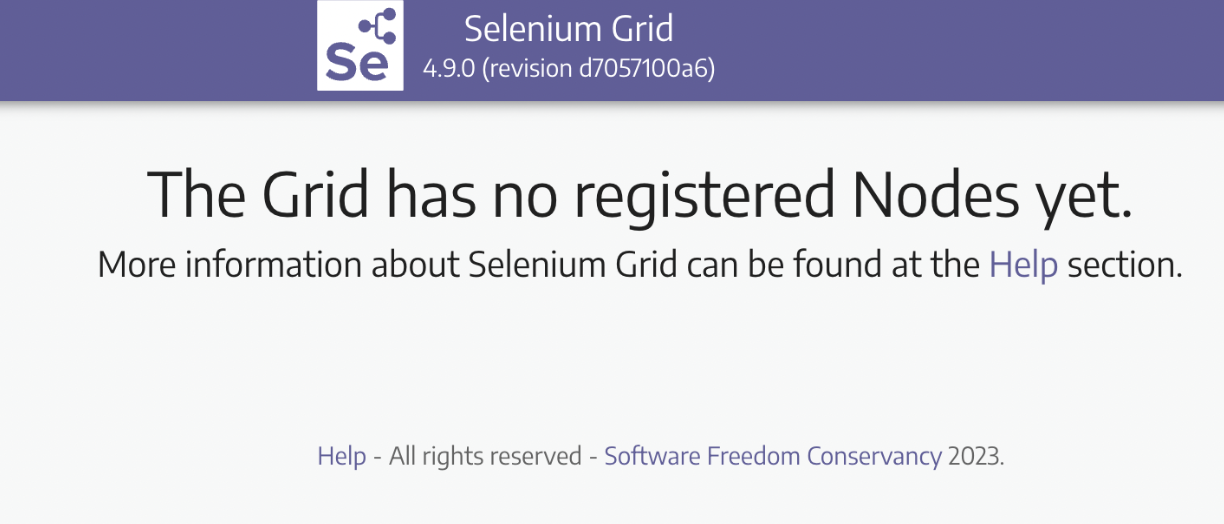
You can see that you have no nodes connected yet. Now by typing the below code, I connect my MacBook as a node to it. Note that since it is the same machine, I don’t need to state my hub address. You do it as well.
java -jar selenium-server-4.9.0.jar node
Now you can see your device as a node. I am going to add my Windows machine as a node as well. To do this, download the jar file to the node machine, and type the below command into the command line of the node machine:
java -jar selenium-server-4.9.0.jar node --hub
http://192.168.0.27:4444/grid/register --port 5555
The bold numbers should be your host’s IP number. You can see it on the terminal where you initiated your hub.

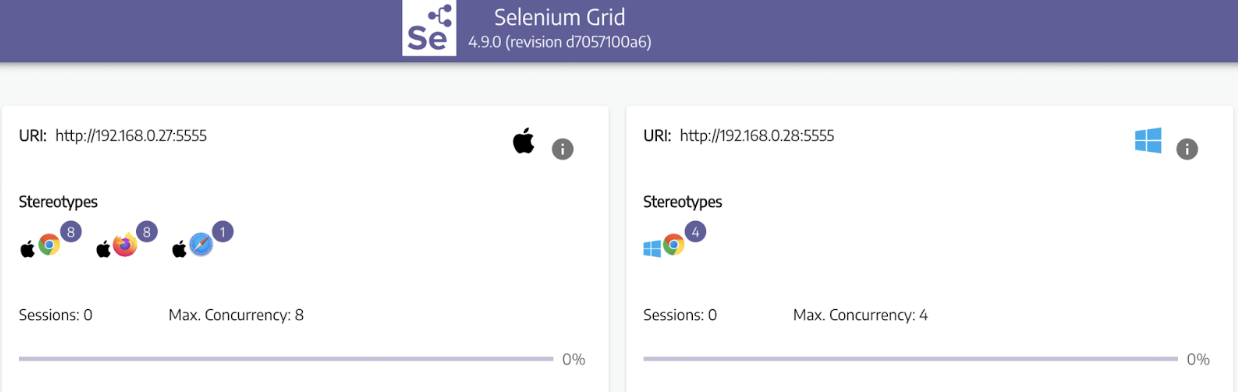
Now you can see both machines on your grid! But in order to use them in parallel, you need to configure your project for concurrent runs. So, let’s get down to it!
Note: For every node, 2 CPUs are recommended, and one Chrome instance that is up and running uses approximately 120 MB of RAM. But you can find the optimal node and instance ratio for your device through trial and error.
Parallel Test Configuration
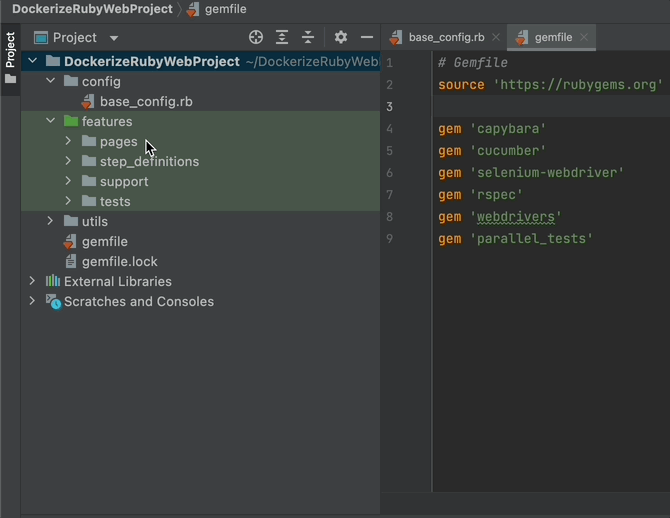
Let’s open your gemfile and add 'parallel_tests' gem to it.
# Gemfile
source 'https://rubygems.org'

gem 'capybara'
gem 'cucumber'
gem 'selenium-webdriver'
gem 'rspec'
gem 'webdrivers'
gem 'parallel_tests'
Then run `bundle update` command on the terminal.

Done!
You need to define a default profile for cucumber to give execute commands for your tests from the terminal.
Now create a cucumber.yml file under the root directory.
And write the below line inside it:
default: "--format pretty"
This makes cucumber shell reports more readable.
Okay, now you can run your tests in parallel. There are several variations for this. Let’s see them:
1. Run your code in parallel by stating the number of sessions with -n argument. The below code will start two browser instances.
parallel_cucumber -n 2
parallel_cucumber -n 2 -o 'browser=remote-firefox'
3. Start multiple parallel execution processes running the same tests but in different browsers.
parallel_cucumber -n 2 -o 'browser=remote-chrome' & parallel_cucumber -n 2 -o 'browser=remote-firefox'
Note that in the second and third examples, you are changing the values of environmental variables with custom values with the -o option.
Now let’s run your code in parallel!
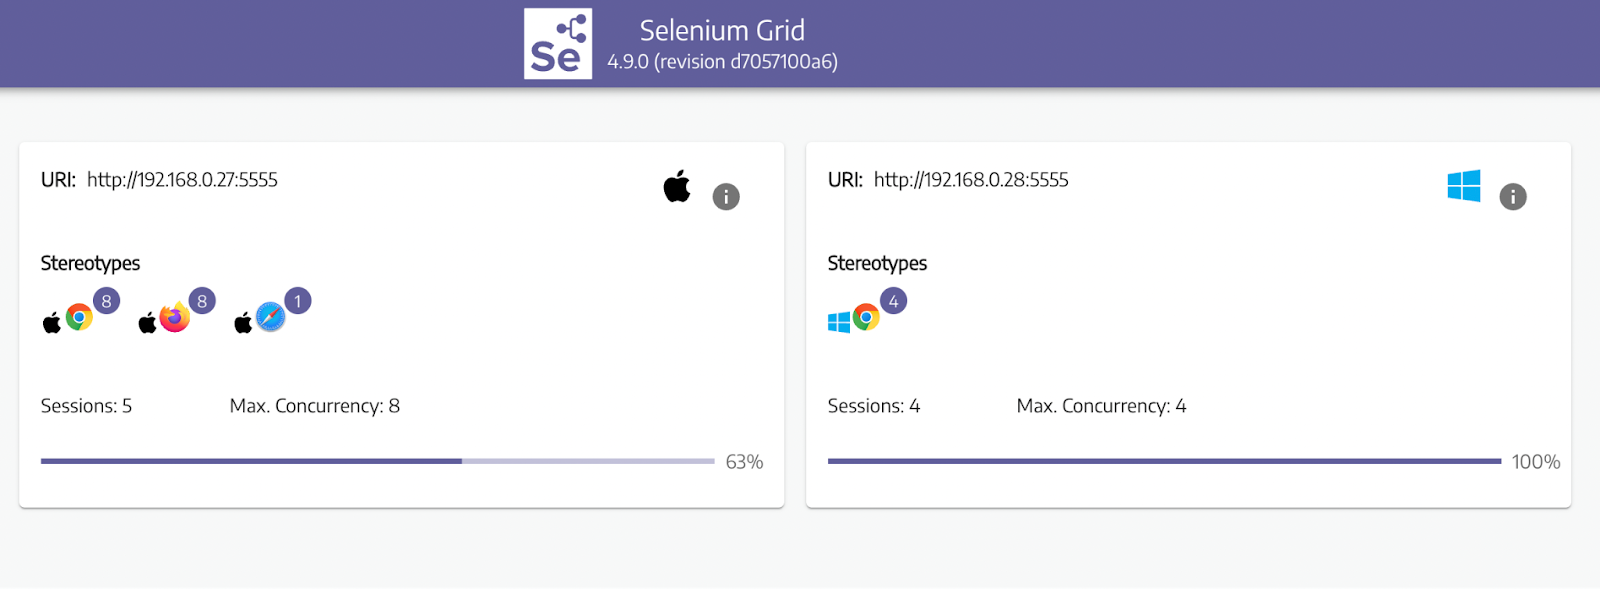
-2.png?width=1600&height=864&name=pasted%20image%200%20(1)-2.png)
And that’s it! Now you can run your code remotely and in parallel! In the 4th part, you are going to dockerize your project and run it in containers in parallel. See you in the next chapter!
