Previously, we created the web test automation project and wrote scenarios. Before configuring the project to be run in parallel, let’s see how to save screen recordings of failed scenarios in this bonus chapter!
- Bonus: Recording Failed Scenario Runs in Ruby
- Let’s Configure Our Web Test Automation Project for Remote Browsers and Parallel Execution
- Let’s Dockerize Our Web Test Automation Project
- Bonus: Recording Scenario Runs on Docker with Selenium Video!
- Let’s Integrate Our Dockerized Web Test Automation Project with CI/CD Pipeline!
- Auto-Scaling and Kubernetes Integration with KEDA
Recording Failed Scenario Runs on Ruby!
Not every scenario runs as it should, unfortunately. To debug your code or pinpoint bugs, it’s best to have some hard evidence. Yes, I am talking about video recordings for your failed test scenarios!
Let’s install “screen-recorder” gem by adding it to your gemfile and running the bundle update command:
gem 'screen-recorder'
bundle update
And then let’s add it to your env file.
require 'screen-recorder'
The gem you are going to use is dependent on the ffmpeg tool. Install it via brew.
brew install ffmpeg
With the command `which ffmpeg`, you can find the bin directory for the ffmpeg:
 ➜  ~ which ffmpeg
/opt/homebrew/bin/ffmpeg
Now add the directory of this binary to your env file as well:
ScreenRecorder.ffmpeg_binary = '/opt/homebrew/bin/ffmpeg'
And integrate the gem with your hook file.
As you remember, you created your hook.rb file in Part 1 of this blog series, and it looks like this:
 Before do
 Driver.get_driver
 page.driver.browser.manage.window.maximize
end

After do |scenario|
 begin
   if scenario.failed?
     puts "FAILED ==> #{scenario.name}\n#{scenario.exception}:#{scenario.exception.message}"
   else
     puts "PASSED ==> #{scenario.name}"
   end
   Capybara.current_session.driver.quit
 rescue Exception => exception
   puts "FAILED ==> #{exception}"
   Capybara.current_session.driver.quit
 end
end
First, you need to configure your before hook. You already know that the before hook is initiated before your scenarios up to this point.
Change your first line to this:
Before do |scenario|
Cucumber provides you with a scenario object, with which you can reach the name of your scenario.
Let’s replace the blank lines in your scenario name with underscores using the command below. Using underscores instead of spaces helps you avoid file name related issues, since you are going to save the videos with scenario names.
scenario_name = scenario.name.gsub(/[^A-Za-z0-9 ]/, "").gsub(/\s+/, "_")
With below line, print the scenario name on the console:
puts "STARTED ==> #{scenario_name}"
Then create a recorder object and state the file name and location with the command below:
@recorder = ScreenRecorder::Desktop.new(output: "output/failed_tests/#{scenario_name}.mkv")
And start your recorder.
@recorder.start
Now put everything together:
 Before do |scenario|
 scenario_name = scenario.name.gsub(/[^A-Za-z0-9 ]/, "").gsub(/\s+/, "_")
 Driver.get_driver
 page.driver.browser.manage.window.maximize
 puts "STARTED ==> #{scenario_name}"
 @recorder = ScreenRecorder::Desktop.new(output:
 "output/failed_tests/#{scenario_name}.mkv")
 @recorder.start
end
Up to this point, you’ve re-organized the before hook. After the before hook, your scenario will run and then the after hook will be executed.
Now configure the after hook. What you initially have is:
 After do |scenario|
 begin
   if scenario.failed?
     puts "FAILED ==> #{scenario.name}\n#{scenario.exception}:#{scenario.exception.message}"
   else
     puts "PASSED ==> #{scenario.name}"
   end
   Capybara.current_session.driver.quit
 rescue Exception => exception
   puts "FAILED ==> #{exception}"
   Capybara.current_session.driver.quit
 end
end
Now alter your scenario name here as well:
scenario_name = scenario.name.gsub(/[^A-Za-z0-9 ]/, "").gsub(/\s+/, "_")
Since you executed your scenario, you need to stop your recorder first:
@recorder.stop
And you need to delete the video file if the scenario passes since you will only need the failed ones. You can delete your video file with the command below:
File.delete("outputs/failed_tests/#{scenario_name}.mkv")
Since you are going to save your files to this directory, you need to create it first:
Now re-organize your if-else and begin-rescue blocks to save only the failed scenario recordings:
After do |scenario|
 begin
   scenario_name = scenario.name.gsub(/[^A-Za-z0-9 ]/, "").gsub(/\s+/, "_")
Capybara.current_session.driver.quit
   @recorder.stop
   if scenario.failed?
     puts "FAILED ==> #{scenario_name}\n#{scenario.exception}:#{scenario.exception.message}"
   else
     puts "PASSED ==> #{scenario_name}"
     File.delete("outputs/failed_tests/#{scenario_name}.mkv")
   end
 rescue Exception => exception
   puts "FAILED ==> #{exception}"
   Capybara.current_session.driver.quit
   @recorder.stop
 end
end
Let’s run your scenarios by running the cucumber command on your terminal and see what happens:
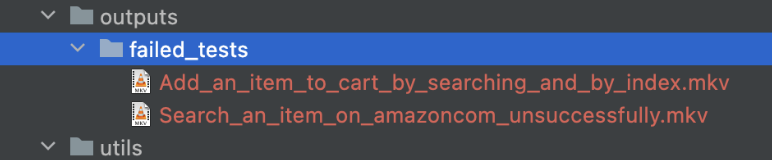
Failed scenario recordings have been saved, indeed!
Note that in MacOS and Linux, this gem records the whole desktop, and you cannot specify specific applications such as Chrome or Firefox. Therefore, you need to run your test scenarios one at a time.
Since this was a bonus feature, I am not going to include these changes in the upcoming parts and continue from where we left off in the second part.
