In this blog post, I am going to examine Crossplane and demonstrate how to set up a production-ready EKS cluster using Crossplane.
Crossplane allows you to manage cloud resources with the Kubernetes API using the kubectl. It helps developers claim cloud resources with just ".yaml" files, similar to other Kubernetes resource definitions. To match developers' claims, Crossplane lets you define infrastructure declaratively without writing any code and without revealing the underlying infrastructure of the specific vendor.
There are two reasons why this tool is significant:
- The Crossplane highlights the underlying Kubernetes control plane's powerful and flexible execution environment. There is no practical limit to the number of custom resources that may be provided.
- Crossplane offers an alternative to Terraform, CDK, and Pulumi. Crossplane has a predetermined list of providers for major cloud services that cover the most typically deployed services. It is not attempting to be a general-purpose infrastructure-as-code (IaC) solution, but rather a companion to Kubernetes workloads.
It's possible to construct new custom resources using the CRDs provided by Crossplane by extending a Kubernetes cluster with ready-to-use CRDs and then connecting them into your CI/CD or GitOps processes. Crossplane is a free and open-source software project. It was initiated by Upbound and was subsequently accepted as a sandbox project by the CNCF and a couple of months ago the project has been approved to move to the next phase as a CNCF incubating project. Granular assets may be combined into higher-level abstractions, which are then managed, distributed, and consumed through various means.
This blog post includes a Crossplane demo, and code samples can be found in this github repository.
Concepts of Crossplane
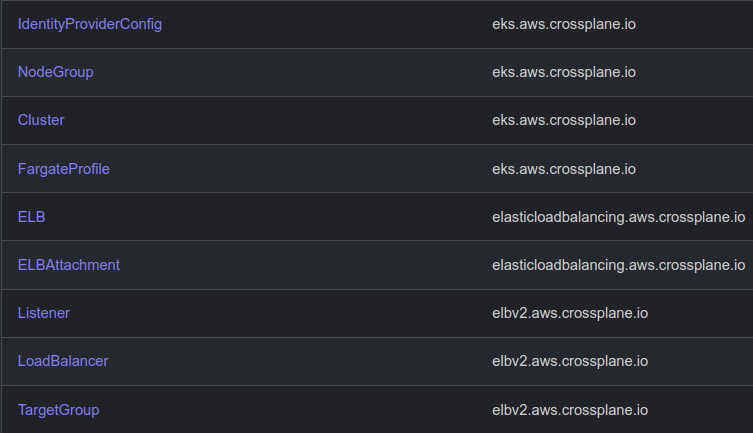
Crossplane introduces the Managed Resource (MR) idea, which is a Kubernetes Custom Resource Definition (CRD) that defines an infrastructure resource made available by a cloud provider. The figure below shows a few of the MR that Crossplane utilizes from the provider-aws API. And also, you can check the complete list of Managed Resources provided by provider-aws.
While managed resources are useful for managing cloud resources, managing a large number of them on a regular basis may quickly become overwhelming. For example, an application developer may not care about the specifics of how an EKS Cluster is built and maintained, such as VPC and Node Group settings. Kube-config might be the only thing they are interested in. On the other hand, an infrastructure operator may not want to provide developer access to all of the EKS options, but just to the ones that are required.

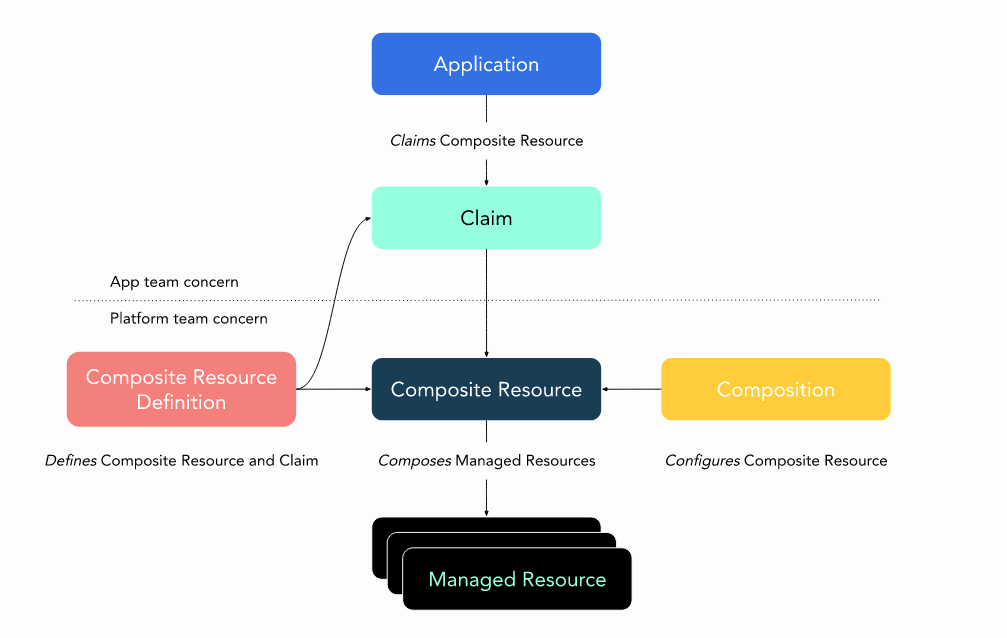
Crossplane provides techniques for composing managed resources, which enables platform teams to design a new kind of custom resource known as a Composite Resource (XR). An XR consists of one or more Managed Resources. Crossplane defines and configures this new custom resource using two special resources:
- Like a CRD, a CompositeResourceDefinition (XRD) specifies the schema for an XR. XRDs are cluster scoped. To facilitate the creation of a namespaced XR, the corresponding XRD may optionally include a Composite Resource Claim (XRC).
- A Composition that defines the Managed Resources that will be included in an XR and their configuration.
How Does Crossplane Work?
Crossplane works as a Kubernetes operator. It has reconciliation built-in, so it always makes sure that the infrastructure is in the right state. You can't make manual changes to the infrastructure at this time. This method eliminates the possibility of configuration drift.
The figure below describes how Crossplane works. If you're familiar with Terraform, an XRD is similar to the variable blocks of a Terraform module, but the Composition is the rest of the module's HCL code that defines how to utilize those variables to produce the slew of resources. In this comparison, the XR or claim is similar to a `tfvars` file that provides inputs to the module.
Platform teams can use RBAC to give their development teams access to "a PostgreSQL database," instead of having to deal with access to things like RDS instances and subnet groups. A platform team can easily support many teams of application developers in a single control plane because Crossplane is built on the Kubernetes RBAC system.
In Crossplane, self-service goes even further because each XR can offer different kinds of service. Compositions are used to describe how an XR works. This is the primary Crossplane API type that controls how Crossplane composes resources into a higher level “composite resource”. A Composition directs Crossplane to build resources Y and Z when someone creates composite resource X.
A new XR can be created either directly in Crossplane or via a claim. A platform or SRE team is usually the only one with the authority to directly construct XRs. Everyone else uses a resource called a "Composite Resource Claim" to handle XRs or claims.
After creating your own XRDs, XRs, and Compositions, it is possible to create and push them to dockerhub as packages. Packages provide additional features to Crossplane, such as support for new types of composite resources and claims, or new types of managed resources. Configurations and providers are the two categories of Crossplane packages. Check the link for further information about how to create and use packages.
Provisioning a Production-Ready Amazon EKS cluster using Crossplane
Let's look at how to provision a production-ready EKS cluster using Crossplane. Users who want to utilize Crossplane for the first time have two options. The first option is to utilize a hosted Crossplane solution such as Upbound Cloud. The second is for users who want more freedom and may also install Crossplane on their own Kubernetes cluster. In this blog post, I will use a Minikube running with version v1.23.2. Also, Kind or existing EKS clusters can both be used to provision the management cluster.
Prerequisites:
Please install the following tools on your machine before moving on.
- Minikube, Kind, or EKS Cluster
- Kubectl
The figure below provides an overview of the configuration of the demo.

The figure below provides an overview of the structure of the repository.
├── Assets
│   └── conf.png
├── aws-creds.conf
├── aws-eks.yaml
├── crossplane-config
│   ├── config-k8s.yaml
│   ├── provider-aws.yaml
│   ├── provider-config-aws.yaml
│   ├── provider-helm.yaml
│   └── provider-kubernetes.yaml
├── packages
│   └── k8s
│       ├── crossplane.yaml
│       ├── definition.yaml
│       ├── eks.yaml
│       └── README.md
└── README.md
I am going to create a namespace for Crossplane components with the following command:
kubectl create namespace crossplane-system
After creating the "crossplane-system" namespace, I will create a secret with my AWS credentials to integrate with AWS.
export AWS_ACCESS_KEY_ID=$your_aws_access_key_id$
export AWS_SECRET_ACCESS_KEY=$your_aws_secret_access_key$
echo "[default]
aws_access_key_id = $AWS_ACCESS_KEY_ID
aws_secret_access_key = $AWS_SECRET_ACCESS_KEY
" >aws-creds.conf
kubectl -n crossplane-system \
    create secret generic aws-creds \
    --from-file creds=./aws-creds.conf
After these steps are completed, I am going to install the crossplane on my cluster via helm chart with the following command:
helm upgrade --install \
    crossplane crossplane-stable/crossplane \
    --namespace crossplane-system \
    --create-namespace \
    --wait
There are no errors, so the crossplane is ready for usage.
After these steps, I am going to install the provider configuration files.
provider-aws.yaml
apiVersion: pkg.crossplane.io/v1
kind: Provider
metadata:
  name: crossplane-provider-aws
spec:
  package: crossplane/provider-aws:v0.22.0
kubectl apply \
    --filename crossplane-config/provider-aws.yaml
provider-config-aws.yaml
apiVersion: aws.crossplane.io/v1beta1
kind: ProviderConfig
metadata:
  name: default
spec:
  credentials:
    source: Secret
    secretRef:
      namespace: crossplane-system
      name: aws-creds
      key: creds
kubectl apply \
    --filename crossplane-config/provider-config-aws.yaml
If the output is "unable to recognize," wait a couple of seconds and re-run the previous command.
provider-helm.yaml
apiVersion: pkg.crossplane.io/v1
kind: Provider
metadata:
  name: crossplane-provider-helm
spec:
  package: crossplane/provider-helm:v0.9.0
kubectl apply \
    --filename crossplane-config/provider-helm.yaml
provider-kubernetes.yaml
apiVersion: pkg.crossplane.io/v1
kind: Provider
metadata:
  name: crossplane-provider-kubernetes
spec:
  package: crossplane/provider-kubernetes:main
kubectl apply \
    --filename crossplane-config/provider-kubernetes.yaml
I have already created my Composite Resource Definition, Composition, and Configuration for a production-ready Kubernetes Cluster and published it to Docker Hub as an OCI image.
config-k8s.yaml
apiVersion: pkg.crossplane.io/v1
kind: Configuration
metadata:
  name: crossplane-k8s
spec:
  package: cemaltuner/crossplane-k8s:v0.2.14
kubectl apply \
    --filename crossplane-config/config-k8s.yaml
The code example below provides an overview of Custom Resource Definition, Composition and Configuration of my package. You can get the code at this GitHub Repository.
definition.yaml
apiVersion: apiextensions.crossplane.io/v1
kind: CompositeResourceDefinition
metadata:
  name: compositeclusters.prodready.cluster
spec:
  connectionSecretKeys:
  - kubeconfig
  defaultCompositionRef:
    name: cluster-aws
  group: prodready.cluster
  names:
    kind: CompositeCluster
    plural: compositeclusters
  claimNames:
    kind: ClusterClaim
    plural: clusterclaims
  versions:
  - name: v1alpha1

.
..
...
eks.yaml
apiVersion: apiextensions.crossplane.io/v1
kind: Composition
metadata:
  name: cluster-aws
  labels:
    provider: aws
    cluster: eks
spec:
  compositeTypeRef:
    apiVersion: prodready.cluster/v1alpha1
    kind: CompositeCluster
  writeConnectionSecretsToNamespace: crossplane-system
  patchSets:
  - name: metadata
    patches:
    - fromFieldPath: metadata.labels
  resources:
  - name: ekscluster

.
..
...
crossplane.yaml
apiVersion: meta.pkg.crossplane.io/v1
kind: Configuration
metadata:
  name: k8s
spec:
  crossplane:
    version: ">=v1.6"
  dependsOn:
  - provider: crossplane/provider-aws
    version: v0.22.0
  - provider: crossplane/provider-helm
    version: v0.9.0
Run the following command and wait until all packages are ready.
kubectl get pkgrev

There are no errors, so the configuration of the providers and the package is ready.
I am going to create a namespace "team-a" for team-a.
kubectl create namespace team-a
Now it is time to provision our production-ready EKS cluster. I am going to use the "aws-eks.yaml" file to provision the EKS cluster.
apiVersion: prodready.cluster/v1alpha1
kind: ClusterClaim
metadata:
  name: team-a-eks
  labels:
    cluster-owner: cem
spec:
  id: team-a-eks
  compositionSelector:
    matchLabels:
      provider: aws
      cluster: eks
  parameters:
    nodeSize: small
    minNodeCount: 3
Run the following command to provision our production-ready EKS cluster.
kubectl -n team-a apply -f aws-eks.yaml
After these steps are complete, run the following command to check the status of our resources and wait until all resources are ready.

Our cluster is ready to use.
The last step is to get the “kubeconfig” file to integrate with the EKS cluster. Run the following commands to get and set the “kubeconfig” file.
kubectl --namespace crossplane-system \
    get secret team-a-eks-cluster \
    --output jsonpath="{.data.kubeconfig}" \
    | base64 -d >kubeconfig.yaml

export KUBECONFIG=$PWD/kubeconfig.yaml
kubectl get ns


Destroy
After all of these steps, Don’t forget to destroy your resources. Run the following command to destroy your resources.
unset KUBECONFIG

kubectl --namespace team-a delete \
    --filename examples/aws-eks.yaml
Conclusion
Crossplane works as a Kubernetes operator and enables you to use the Kubernetes API to deploy, create, and consume infrastructure for any cloud service provider. It allows you to define infrastructure declaratively without having to write any code. The number of custom resources that may be offered has no practical limit. Because of this, it gets a thumbs up from me.
