Appium 2.0 is officially released! It is the most significant and highly anticipated release in the past 5 years. It’s finally time to celebrate this release!
The main purpose of this highly anticipated release is to make the test automation process more modular and flexible. This includes transitioning to a new architecture for extensions and drivers. One of the key objectives of the release is to further strengthen Appium through the contributions of the community.
I would like to share with you the major new features and the breaking changes that come with the new version
Major New Features
Protocol changes
The most significant and extensive change in Appium 2.x occurred in its architecture. It will no longer support the old JSONWP (JSON Wire Protocol) and MJSONWP (Mobile JSON Wire Protocol) protocols. These protocols were used in Selenium and Appium before the W3C WebDriver Protocol was accepted as a web standard. Up to Appium 2.0, it also supported the W3C WebDriver Protocol along with these old protocols, thereby enabling older clients to communicate with new Appium servers. However, this changes with Appium 2.0, and from now on, only the W3C WebDriver Protocol will be supported. This step directs Appium users towards a future of working in a more consistent and standard way across various platforms and technologies.
New Installation Process
With Appium 2.x, the steps for Appium installation have changed. Let's take a look at the new installation steps.
First of all, you need to upgrade your Appium version to 2.0, so let’s start with upgrading.
To install Appium 2.0 globally, you need to run the npm command below.
npm i --location=global appium
To verify the installed Appium version, run the following command:
appium -v

Appium drivers no longer come as default with the installation of Appium 2.0. Although this change adds steps for installation, it also brings some benefits.The size of Appium installation has significantly dropped, eliminating the need to include drivers you don't use. As drivers can now be updated independently, you can update them without updating the entire Appium framework, or keep the drivers at a stable version while updating Appium. Additionally, you can create your own driver in compliance with the Appium driver architecture or install drivers shared within the community.
You can install Appium drivers using the following commands:
appium driver install uiautomator2
appium driver install xcuitest
appium driver install flutter
appium driver install espresso
To make sure that all the drivers are installed, run the following command:
appium driver list
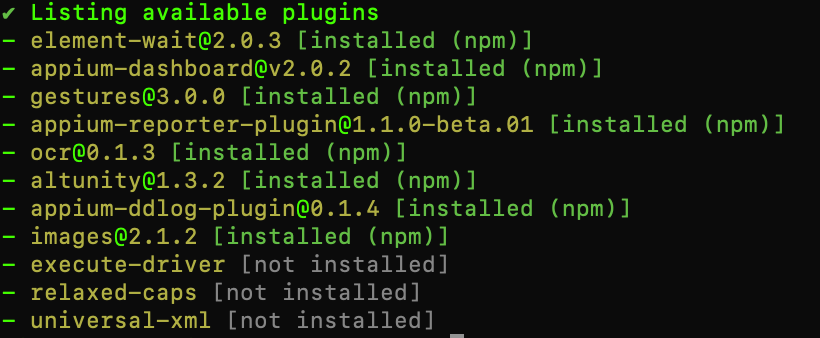
With Appium 2.0, another installation step involves independently installing the plugins. First, you can retrieve the list of available plugins by running the following command:
appium plugin list
You can install any plugin by running its respective installation command:
 appium plugin install
 appium plugin install images
 appium driver list

Tips:
You can also use the 'appium-installer', a helper tool designed to simplify the installation steps. This tool was developed by the AppiumTestDistribution group, and it is officially recommended by Appium.
Beyond Appium's official installation steps, community-developed appium-installer npm library simplifies the installation process. With appium-installer, you can choose the drivers and plugins you want to install and complete the installation with a single command. You may realize that the installation steps of appium-installer are very similar to the installation steps of webdriver.io.
Let's look at the installation steps of Appium 2.0 using appium-installer.
You install the appium-installer globally by running the command below. Subsequently, you execute the appium-installer command, choose the drivers and plugins we wish to install, and thus complete our setup.
Install appium-installer
npm install appium-installer -g
Install Appium
appium-installer
Install drivers and plugins from anywhere
Now, let's explore the features of Appium's Extension CLI for managing drivers and plugins.
Let's take a look at how you can install other drivers developed by the community or not maintained by the Appium team.
The syntax for installing drivers and plugins is:
appium install [--source=] [--package=] [--json]
Required arguments:
- <ext-type>: driver or plugin
- <install-spec>: this is the name, location, and/or version of the extension you want to install.
Optional arguments:
- --source: this directs Appium to where to find your extension. See the table below for details
- --package: when <install-source> is git or github, --package is required. It should be the Node.js package name of the extension.
- --json: return the result in JSON format
|
Source |
Description |
Example |
|
None |
Without a '--source', Appium automatically matches to official extension names and installs the latest version of any match via NPM |
appium plugin install relaxed-caps |
|
npm |
Install an extension via NPM |
appium driver install --source=npm appium-tizen-tv-driver@0.8.1 |
|
github |
Install an extension via a GitHub org and repo |
appium driver install --source=github --package=ppium-windows-driver appium/appium-windows-driver |
|
git |
Install an extension via a Git URL |
appium driver install --source=git --package=appium-windows-driver https://github.com/appium/appium-windows-driver.git |
|
local |
Install an extension from a local path on the filesystem |
appium driver install --source=local --package=custom-driver /usr/local/plugins/custom-driver |
Configuration Files
In addition to command-line arguments, Appium has now extended its support to include configuration files. Essentially, nearly all parameters that were once exclusively provided through the CLI in Appium 1.x can now be managed through a configuration file.
Let's consider the advantages of customizing the configuration file. First, customization provides flexibility. You can easily switch between different configurations for various test scenarios. For instance, if you have different sets of devices or platforms, you can maintain separate configuration files for each set and switch between them as needed. Second, instead of passing a series of command line arguments every time you start your Appium server, you can manage your configuration from a file. Finally, configurations can sometimes be a nuisance during installations. It is also beneficial to have the same configuration settings for all team members. You can share configuration files within the team and operate with consistent Appium server settings.
Let's look at how we can configure the config file.
Appium supports JSON, YAML, JS, and CJS file types for configuration files.
You can name the configuration files anything you want, however, files named appiumrc.json (as recommended) will be automatically loaded by Appium
To specify a custom location for your configuration file, you can run the command 'appium --config /path/to/config/file'.
Let's examine an example of how you can configure plugins and drivers.
{
"server": {
 "use-plugins": ["my-plugin", "some-other-plugin"]
  }
 "driver": {
  "xcuitest": {
    "webkit-debug-proxy-port": 5400
  }
 }
}
Breaking Changes Features
Server Base Path
In Appium 1.x, the default server path “/wd/hub” was discontinued. It was changed from “http://localhost:4723/wd/hub” to “http://localhost:4723/”. However, if you wish to adhere to the old practice, you can launch the Appium server with the following command or set it in the Appium configuration file as 'basePath: ‘wd/hub’.
appium --base-path=/wd/hub
Driver-specific Command Line Options
With Appium 2.0,, the CLI parameters specific to drivers and platforms have been moved under the drivers. This change provides easier management flexibility and organization for driver-specific parameters, thereby eliminating confusion about which parameter belongs to which driver.
Let's examine the old and new usage with the examples below.
Appium 1.x
appium --webdriveragent-port 8100
Appium 2.x
appium --driver-xcuitest-webdriveragent-port=5000
Capabilities
With Appium 2.0 supporting W3C standards, capabilities have changed as well. Except for W3C standard capabilities (like 'browserName' and 'platformName'), a vendor prefix has been incorporated. A vendor prefix is a string succeeded by a colon. For example:
- appium:app
- appium:noReset
- appium:deviceName
"WD" JavaScript Client Library No Longer Supported
Over the years, some of Appium's creators have maintained the WD client library. However, with Appium 2.x, this library has been deprecated and hasn't been updated for use with the W3C WebDriver protocol. Consequently, if you're using this library, you'll need to transition to a more modern one. At this juncture, both Appium and the WD client library recommend WebdriverIO. WebdriverIO, with its updated features, fully supports the new protocol standards introduced by Appium 2.0.
Appium 2.0 brings new possibilities
I've walked through the new features of Appium 2.0 and given some examples. These enhancements, which enable anyone to develop and share drivers and plugins, open the door to a world of development opportunities far beyond the iOS and Android platforms. I hope this blog post was useful in helping your transition to Appium 2.0.
